
Description
50mm Lift Kit: Polyurethane Bushing Set for Caster Correction
If you are installing a 50mm Lift Kit, you can correct the caster with this Polyurethane Bushing Set. As you lift the vehicle, the wheels are essentially twisted back, away from the vertical axis — creating a most positive caster angle. The result is that the vehicle may wander on the road or hop a bit. You may find yourself constantly applying steering input to keep the car going in a straight line. The car may feel unsafe and it may be unsettling to drive. But you can fix the problem with these bushings.
Notes:
– Made in Germany
– Front Axle Only
– Special Orders do not include Air Freight, Customs, Taxes, Duties
Installation Guide (from ARB who makes nearly identical kit for the LR Defender):
Installation Notes (from the Manufacturer in Germany):
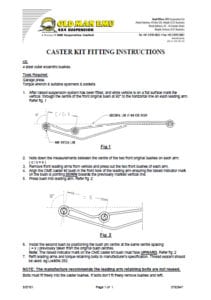
Turn the front bush in the trailing arm with the hole to the upper edge and press in. Then the hole spacing on the axle, take and press in the rear socket accordingly.
A template with the hole spacing is helpful. But he has to make himself. See also here (although from the Defender but in principle the same):
Caster Kit for Land Rover Defender from about ’90 and for Discovery 1 to about ’98 from OME®
1. Install undercarriage, make test drive, place vehicle on level ground, hold the solder over the front fixing bolt of the trailing arm and mark the lowest point (on both trailing arms).
- Secure wheels with wedges, remove a trailing arm, make the gauge, press out bushes of the axle mounting
- Turn a Caster Kit bushing with the raised marking to the mark on the trailing arm and press in
- Position and press in the second bushing with the aid of the gauge (mark on the bushing must point upwards)
- Check the tension-free installation position of the bushings with the gauge
- On the other trailing arm Remove the screw and loosen one, now the trailing arm can be installed with the new bushings
- 2nd trailing arm also replace sockets, as described above and reinstall.
Making the gauge:
- Insert two M16 screws into the holes of the original bushes in the trailing arm and weld in as a piece of flat iron or pipe.
- With this method, then the correct distance of the Caster Kit jacks can be adjusted to one another when pressed into the trailing arm.
Only if this distance is exactly right, and both sides were pressed in the same position, the trailing arm can be mounted stress-free on the axle. If they are mounted braced, the life expectancy is low.
Notes: This part may be considered a Special Order if custom-made, low volume, or not something we generally stock. There may be a cost for Air Freight, Customs, Taxes, and Duties. Your card will not be charged during Checkout; only an Authorization will be obtained. If necessary, we will contact you with details before processing the order. Please review our Terms & Conditions before ordering.


Reviews
There are no reviews yet.